My first semester of college I watched a friend once take all the pennies out of his wallet and throw them away (we were at a fast food place...so I wasn't about to dive after them). It seemed so odd to me to throw money away...even if it was just a few cents. Right then I started collecting any pennies I found. I picked them up off the street, gathered them from under the cushions and saved my change. I was going to see how long it took for the pennies to add up. Well, it was slow but over time I had over $20 in pennies. Not too shabby. After graduating I didn't keep up with my "project" as heartily, but I still had most of my penny stash. But...I didn't ever know what to do with it (I'm a scrooge with my hard sought pennies and don't want to pay the fee to have the machine sort them so I can have my few bucks). Lately on Pinterest I've seen quite a few different penny projects, but I hadn't ever done one until we received a project that needed testing.
The Original Pin
 |
| http://www.moneypit.com/article/natural-non-toxic-wood-stain-coffee-berries-and-more |
(No...that isn't what this stain actually looks like...but that is the only picture on that page so that is the picture that gets pinned all over Pinterest. I haven't found a picture of penny stained wood). You can make a wood stain by putting pennies in vinegar! The site says, "Vinegar works as a wood stain when you add a metal object in the mix and let it sit in a glass container for a week. A handful of pennies will produce a beautiful pale Caribbean blue stain." Allison tried it out and sent it to us.
The Pinstrosity

Not the Caribbean Blue she was expecting. Here's what she did:
"Day 1: Placed a "handful" of pennies in a jar with vinegar.
Days 2-6: Every time I walked by and thought of it, I would just shake the jar a little. The instructions don't say to do this, but I thought, "What could it hurt, right?!?"
Day 7: Opened the jar (very difficult to open by the way--I don't know why, but it was really bad!) and proceeded to use a foam craft brush to give the 2x4 I used a good coat of the stuff. After that dried, I coated it again, and again, and again (5 times in all.) As you can see from my picture, 5 coats did a little something, but not much at all. Not enough to make me get the "Hey! That wood looks kind of like barn wood!" feel and it definitely wasn't worth my time to put 5 COATS for that result."
"I'm not sure there is much hope for this project. Upon further examination of the vinegar on day 7, I realized that most of the apparent darkness was actually just an illusion. Little floaties from the pennies were actually most of what made my "stain" (if you can call it that) look darker. I want to try using a different type of metal (like steel wool) and see if that has a better result. There just wasn't enough of a chemical reaction between the copper and the vinegar to give a nice stain to the wood."
So it was a disappointing bust of a project for Allison, but it got me quite intrigued and I wanted to test this one out a little bit further. Out came the remains of the penny stash.

Found that penny jar at a thrift shop when I was in high school and had to have it.
I dumped out my pennies...take a guess at how many are in that pile.

1962 pennies! Did you guess anywhere close?
I decided that I wanted to test this one out pretty thoroughly, so I got "scientific" with it. I sorted the whole penny pile out in decades and then counted how many pennies were in each decade pile (for those interested, 2010-present: 62, 2000's: 842, 1990's: 491, 1980's 322, 1970's: 176, 1960's: 62, 1950's: 2, 1942: 1 1919: 1, unidentifiable: 3). I wanted to make sure that I had the same penny to vinegar ratio in each container, so I calculated out 1/8 tsp. per penny of vinegar and poured it in jars and then added the pennies.

The 1990's took two jars because I couldn't find another jar large enough, but the ratios are still right in their separate jars.
Since pennies had a much higher copper content before 1982, I was curious to see what each individual decade would produce as far as a tint. I left these jars on the counter for 16 days (I know...it said a week, but I extended it) and here's what I got:

Some jars seemed unchanged...some were dirty and nasty and one was tinted blue.
.jpg)
Mostly unchanged.

Mostly unchanged.

Dirty and nasty!

Clear until shaken up...then dirty.

Unchanged vinegar, but pretty and clean pennies.
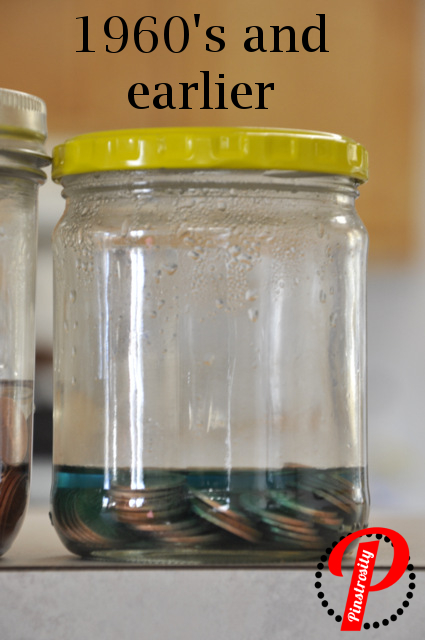
Caribbean Blue!
I figured the 70's pennies were going to give me the best tint...but there wasn't any tint at all!
The pennies from the 80's and 90's fared the worst...they were nasty and had a weird film on them and they just weren't pretty at all.

So I got to work to see how the stain worked. I had a cute little unfinished wood bird house that I got in the craft section at Walmart. I don't know what kind of wood it is...the label didn't say. Cheap wood...from the cheap tree. Here's the progress:
 |
| (click to enlarge photo) |
By the end of the 8th coat the stain was quite pretty. It didn't take too long to dry between coats either.
So there you go...the penny stain does work, but you need older pennies. Just a "normal" handful isn't quite going to do the job for you. And you will have to do multiple coats (but that's pretty normal for a stain...this isn't paint you know).
Want to see how I finished the bird house?

I painted the trim copper and then super-glued pennies to the roof as shingles. This'll make a cute addition to our bird bedroom decor.
Now I need to go find a pin on "How to get super glue off your fingers."

0 comments:
Post a Comment